How to create Glossy Buttons
Step 1:
Let’s start out by creating a new file. I used a 400×200 pixels canvas set at 72dpi, and I filled my background with a white color. Now create a new layer set and name it ‘Glossy Buttons’.
Select the Rectangle Tool and above your screen under the options palette check anti-aliased. Create a new layer and draw a rectangle with 126×27 px dimensions and #B8F416 color shade.
Step 2:
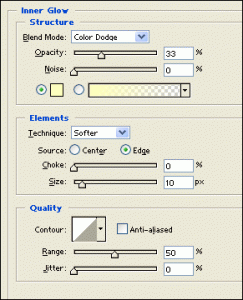
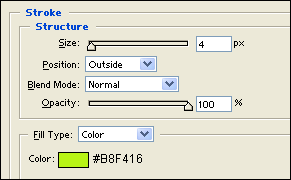
Under Layer Style (Layer > Layer Style) add an Inner Glow and Stroke blending options to your green rectangle layer.
Step 3:
Now draw a skinny rectangle with 134×12 px dimensions and #B8F416 color shade right above your large rectangle.
Step 4:
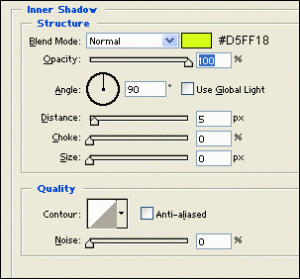
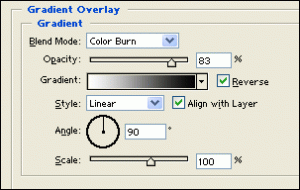
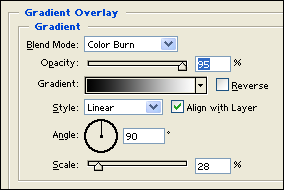
Under Layer Style (Layer > Layer Style) add an Inner Shadow and Gradient Overlay blending options to your skinny rectangle layer.
Step 5:
Now choose the Horizontal Type Tool and set the font family to Arial, bold, 16 pt, strong and #659000 color shade. In a new text layer type the name of your first glossy button.
Step 6:
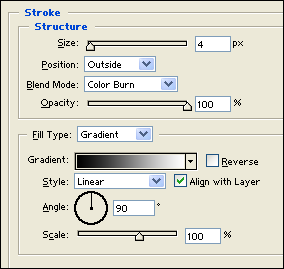
Under Layer Style (Layer > Layer Style) add a Gradient Overlay and Stroke blending options to your text layer.
Results:







I searched for Photoshop tutorials on Google for weeks and came across this. This has been one of the best tutorials I have come across in a long time. Thanks for sharing.